HomeAbout MeProduct VideosProductsWholesale Inquiries

Thursday, December 12, 2013

Handmade from the Heart, an Oliver Family Christmas Tradition


Hello blog friends and welcome to day 12 of D's Paper Studio's, 12 Days of Home for the Holidays. It’s been really cool reading all about the traditions of each of the artists who participated this year.
Handmade gifts are from the heart, and there’s no better way to share your love and joy for the season than to give something that you’ve made by hand.  In our family we have a longstanding tradition of handmade Christmas ornaments.

Hand-stitched felt teddy bears, painted wooden ornaments, handmade photo ornaments, some nearly 50 years old hang on our Christmas trees, and every year when we get them out to hang them, it’s an opportunity to share and re-live the memories of Christmas’ past.
This year, since we were all together at Thanksgiving, I took the opportunity to share our tradition with some of the younger members of our family.  We created Christmas rosettes that are beautiful enough to hang as ornaments, but could also be used as Christmas banners, present toppers or even clustered together as wreaths.

I knew there would be some teaching opportunities with the younger ones.  We got to learn about cutting, measuring, and folding, and my nieces even mastered the scoreboard.
  
     
Our Christmas rosette ornaments turned out beautifully...and once we got started, everyone created more than one. We kept our craft table set up and going all throughout Thanksgiving weekend.  The kids were so excited, they made them for their friends, for their teachers and lots of their own tree at home. 
And, when we discovered that we could use die cut photos to decorate the Christmas rosettes, the ornaments became another way that we could share memories of holidays past. 
Creating Christmas rosettes was really one of the most fun ornament projects we've ever done in our family.  We ended up with lots of new ornaments to share and lots of new ornaments for our own Christmas trees. And, together, we created some Christmas memories that we can treasure forever. 
Our Thanksgiving weekend was really special this year, we had everyone from our generation of Olivers together at one place at the same time...it was something that had not happened in over 15 years...so we were very blessed to share the family time together and to continue our family tradition of handmade Christmas ornaments with cousins and younger members of our family. 


Thank you for letting me share our Oliver family tradition of making Christmas ornaments. I hope you have a wonderful holiday season this year, and make some time to create and give something handmade.  It's a wonderful tradition that is from the heart and will bring joy to everyone for years to come.


Merry Christmas,
Ken

Monday, December 9, 2013

Vintage Handmade Cards with Craft Attitude

Hi there, thank you for stopping by today, it's my turn on the Craft Attitude Blog Hop.  I was really excited to add some "attitude" to vintage handmade cards.


Since I knew the Craft Attitude film was transparent, I knew it would give me the opportunity to add texture and visual interest behind whatever I chose to work with.  I chose to reproduce some original collage pieces I'd created earlier this year.  The originals have embossed copper backgrounds, and dimensional pieces that are kind of bulky to use as cards. I've never reproduced any collage piece I've created so I knew I'd get to explore some new techniques.  Using the Quilt Attitude would allow me to transfer my scanned images onto an antique linen napkin, thus adding a linen texture behind my collage image.

I used the Flip Pal Mobile Scanner to scan my original collage pieces.


Then printed the scanned images onto Quilt Attitude film. Applied the film to antique linen, as the package directed...


You can see where the linen texture is visible through the transparency of the Quilt Attitude Film.  I like the texture it added when I reproduced the collages and applied them to linen.  It looks like the image is printed on a canvas.

To create the cards, I die cut the linen with Spellbinders Grand Calibur machine and Spellbinders Card Creator Die Templates.


To create the card bases, I recycled and die cut manila file folders; It's a cool way to reuse something that is still usable.  
Working with Craft Attitude on this project was really cool...it let me digitally reproduce a 3-D collage to create a 2-D card...and let me alter the original image by transferring it to antique linen...the texture is great behind the collage image.  


Thank you again for stopping by today on the Craft Attitude Blog Hop...I loved using the products and I see lots of possibilities with Quilt Attitude...handmade fabric Christmas ornaments, fabric gift bags, photo throw pillows...

You'll want to see how everyone else has used Craft Attitude too.

Jonathan Fong’s Christmas Roses
Trudi Sissons’ Collage Tutorial
Candie Cooper’s Personalized Ornaments
Nov. 27 – Tammy OConnell
Julie McGuffee’s Glass Block
Dec. 5 – Kathy Cano-Murillo
Dec. 9 - Ken Oliver (You are Here)
Dec. 12 - Cathie Filian

til next time, stay inspired,
Ken


Wednesday, August 28, 2013

Untitled Acrylic on Canvas


Untitled
12" x 12"
Acrylic on Canvas

I'm branching out and experimenting with some new painting techniques. Textured molding paste, acrylic paints and wax pastels gave some cool effects on this untitled 12" x 12" canvas.  


Wednesday, August 14, 2013

Embossed Copper Tag Deck

This embossed copper tag deck is one of those projects that I love to make.  When you make this, you'll add some great new "mixed media" techniques to your arsenal of creative tricks. You will love the results.  


The techniques I used are all pretty standard paper crafting techniques.  The trick is to apply them to different substrates or media.  


I embossed and inked kraft*tex™ for the base of each tag. 


Then cut, embossed and applied patina solution to copper sheets. 


Used some basic collage techniques to create the tags.


And added some additional ephemera, findings and trinkets to complete the collage for each tag.   


To finish the tag deck, I bound them all together with a bronze binding ring.  They look great and have a real vintage feel.  I like this project so much that I'm planning to teach it as a class this fall.  If you like it, please let me know, I'd love to share the class with you and your friends.  

Thank you for stopping by today.  I hope you'll be inspired to go make something beautiful.
Ken


Resources:
Spellbinders Paper Arts; Die Templates and Embossing Folders
C&T Publishing; kraft*tex™ Kraft Paper Fabric
Graphic 45; Scrapbook Paper


Sunday, July 28, 2013

John Wayne Inspired Gift Card Holder with Embossed Kraft*Tex


Hey blog friends, here's a cool John Wayne inspired gift card holder that you will love to give, and  any guy on your gift list would love to get.  


I used some great new products: die templates and embossing folders from Spellbinders; paper from Graphic 45, and kraft·tex™ from C&T Publishing. If you haven't used kraft·tex™ before, you are going to love it! It's rugged paper that looks, feels, and wears like leather, but sews, cuts, and washes just like fabric. And you can die cut and emboss it with Spellbinders die templates and embossing folders.


kraft·tex™ is very similar to the material that the waistband tags on Levi's jeans are made from...it's really rugged and durable, yet you can treat it just as would paper for craft projects. It embosses really nicely! It looks and feels like leather! 


Vintage elements like an antique game piece and a small loop of twine really make this gift card holder feel like something from an old west movie.  


This John Wayne inspired gift card holder is great for a gift card or movie passes and any guy on your list would love it's vintage western appeal. 


Thank you for stopping by today...I hope you like this project.  I'd love to hear what you think...feel free to leave a comment below! 

til next time,
Ken

Friday, July 12, 2013

Hatpin Bezel Heritage Scrapbook Layout: Spellbinders® Shape It Up Sneak Peek and Giveaway Day 2


 Hi Bloggers, and welcome to day 2 of Spellbinders Shape It Up Sneak Peek and Give-a-way!  It’s really an exciting time of year at Spellbinders, as we’re gearing up to launch a brand new line of dies and accessories that are really going to blow you away!  Our newest releases are the most innovative in the industry. The projects you see here today and in the next few days are going to inspire you beyond belief.  So get ready to be amazed!  Make sure you read all the way to the bottom of the post. There’s a chance to win Dies, Hatpin Bezels and Texture Plate I used in this layout. The details to win are listed at the end of this post.  

 We all love creating scrapbook pages and I especially love vintage themes and heritage layouts that incorporate old family photos to memorialize our ancestral background.  Our new Hatpin Bezels and matching dies are perfect embellishments for scrapbook layouts and cards where you’d like to imbue a feeling of yesteryear into your work.   

Using the matching dies, you can coordinate the paper to match the layout, or you could even die cut a piece of fabric from vintage clothing to use inside the hatpin.  This layout features elements of days gone by you will love, an accordion pleated fan, “heirloom” hatpins, and a vintage photograph that tell the story of a 19th century family frozen in time.     

S4-351 Spellbinders Spiral BlossomsOne


MB3-004 Spellbinders  Media Mixage Diamond HatpinBezels

MD1-014 Spellbinders Media Mixage Diamond Dies
MT1-010 Spellbinders Media Mixage Music Note Texture Plate

MM1-003 Copper

Cross Promotional Partners

Scrapbook Adhesives® by 3L Crafty FoamTape

Melissa Frances Embellishments

ICE Resin

Other:  Maya Road flowers,  Prima Marketing flowers Pink Paislee patterned paper, chalk ink, scissors, vintage photo, pastels, sanding block, seam tape or ribbon, misting bottle with water, score board, small mixing cup and craft stick, cotton swab, paper towels, paper trimmer.  

Instructions:
Hatpin Preparation:  Hatpin Bezels are filled with colored resin to mimic the look of a stone set inside a bezel. 
1.        Wipe hatpin bezels to remove any dust. 

2.        Mix ICE Resin according to package directions.
3.        Choose a pastel color to create resin pigment. Using a craft knife, scrap pastel stick to make approximately ¼ teaspoon of pastel dust.  
4.        Add pastel dust to mixed resin and thoroughly mix pigment (dust) into Ice Resin.

5.        Using a craft stick, slowly drip colored resin into hatpin bezels until resin domes.   Set aside to cure for 6-12 hours.
6.        Sand front and back of a piece of copper sheet.

7.        Cut two #2 (with #1 being smallest die template) and one #3 with Diamond Die from sanded copper using Grand Calibur machine.
8.        Place Music Note Texture Plate on gray Base Plate. Lay diamond die cuts on top of plate and cover with white Cutting Plate and pass through Grand Calibur machine to texture. 

9.        Using a cotton swab, apply patina solution to front and back of textured die cuts. Lightly wipe off excess solution with paper towel and sand raised embossed pattern to reveal music notes.

10.      Glue textured metal pieces to back side of hatpin bezels as shown. Set aside to dry.
 Prepare the Layout:
11.      Randomly tear and curl edges of a 12”x12” piece of patterned paper to create a distressed look for layout background.  Apply chalking ink to edges for an antique feel.

12.      Trim a 4”x 8” strip from patterned paper.  Lightly mist paper with water.  Place Music Note Texture Plate on gray Base Plate. Lay one end of paper on top of texture plate and cover with embossing sandwich (Tan Mat and Pink Embossing Plate) and run through Grand Calibur machine. Move paper down and repeat until whole strip of paper is textured. 

13.      Place textured strip on score board and score at ¼” intervals. Accordion fold strip and glue folds together on one end to create a fan. Set aside to dry.

14.      Position fan at a 45º angle on upper right side of background page.  Affix to page with 3-IN-1 Glue. 
15.      Cut/Emboss Grand Decorative Circles #3 and #4 from patterned paper. Layer, offset and adhere die cut circles with foam tape.

16.      Affix outer circle on to of glued portion of fan with foam tape.
17.      Layer four 1” pieces of foam tape together and place under lower left potion of die cut circles and mount to page. Make 3 more stacks of foam tape and add around perimeter of die circles for support. Refer to photo.

18.      Sand and lightly ink edges of a photo for a vintage look. 

19.      Using foam tape, affix distressed photo on top of die cut circles at a slight angle.

20.      Glue Hatpin Bezels, Melissa Frances Embellishments and seam tape bow to photograph as shown.
 Flowers:
21.      Cut/emboss an assortment of Bitty Blossoms and Spiral Blossoms One form coordinating patterned paper.  Roll outside end of die cut flower into a spiral towards center circle and adhere to circle base. Flair out petals to form flower. Repeat until all flowers are formed.


22.      Arrange with other flower and adhere with 3-N-1 adhesive in a pleasing composition as shown.

Create a Journal or Title Tag:

23.      Cut/Emboss 5 x 7 Matting Basics B #1 and #2 from patterned paper and ink edges.
24.      Stamp sentiment on #1 die cut.

25.      Layer and affix tags together with foam tape. Mount in upper right hand corner with foam tape.
You are going to love the unique details you can add to your work with Spellbinders new Hatpin Bezels, dies, and Musical Texture Plates.  They will let you add loads of personality and charm to your handmade cards and themed scrapbook layouts. 

 The Hatpin Bezels can be used in lots of other projects too….I love creating mixed media projects and the Hatpins are the perfect little “findings."
 
 In this project, “Little Box of Secrets,” I altered a small wooden box and used the Hatpins as key elements in the composition. 


A resin filled Hatpin Bezel with a die cut piece of paper, becomes the all-seeing "3rd Eye" on the outside of the box.  I layered findings and beads with a Hatpin Bezel to create a tiny finial for the top. I used black pigmented resin to fill the bezel to look like onyx.  A torn piece of textured paper becomes a backdrop for a tiny horse and chariot.   You're going to find that the Hatpin Bezels, dies and texture plates are really fun to use in all kinds of projects! 
Now, you know there are prizes and give-a-ways during Spellbinders Sneak Peek…here’s what to do:

For official contest rules click HERE!!
For the chance to WIN...CLICK HERE!

And to find even more inspiration, visit my friend Judy Hayes at Creating My Style Here's a little peek of what she's creating with the Hatpin Bezels.  I think you're going to love it. 


Thank you so much for stopping by today during Day 2 of Spellbinders® Shape It Up Sneak Peek and Giveaway.  I hope you love what you’ve seen and will be inspired to create some vintage details or mixed media elements for your work with Spellbinders New Hatpin Bezels, Dies and Musical Texture Plates.  
Make sure to enter the contest…you are going to want these goodies in your craft stash! 
Questions?  calexander@spellbinders.us No entries will be accepted at this email address.

Your creativity is limitless - Explore Beyond™!

Thursday, July 11, 2013

Use Paint Chip Samples to Make Fun Summer Crafts


Paint chip earrings are fast and easy to make.  You can even “card” them on a paint chip sample to make them a perfect little summer gift. 


Supplies:

Spellbinders® Grand Calibur®

S4-112 Classic Ovals SM Die Templates

Color Coordinating Paint Chip Samples

Earring Wires

Liquid Adhesive

Small Hole Punch

(Optional, bling or gem-stone stickers)


Instructions:


1.       Using the Grand Calibur, and Classic Ovals SM, cut oval shapes from paint chip samples with dies  #1, #2, and #3 from the set. 


2.       Glue ovals together to create 2 layered paint chip ovals.


3.       Using a small hole punch, punch a hole at one end of each oval.


4.       Insert Earring wire in each oval.


5.       Embellish with bling if desired.


Here's a video from Spellbinders Try it Tuesday with more ideas for creating fun summer crafts with paint ship samples.


Cool tip: use other Spellbinders Nestabilities® dies to create different shaped earrings. 

 Thanks for stopping by today...

Ken


Tuesday, April 16, 2013

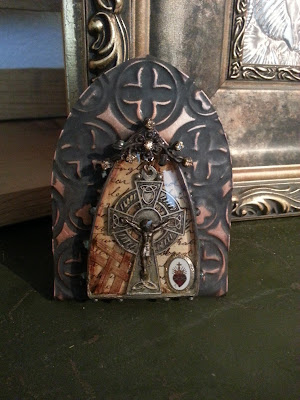
Tiny Shrine: Celtic Crucifix with Keys

Hey there, I am glad you stopped by today, I have something very unique to share.  I've been seeing so much amazing art lately and I've found myself drawn to tiny shrines.  I love the way tiny shrines communicate something that is important to the one who makes it or the one owns it.  And, for whatever reason, religious iconography is really fascinating and beautiful to me so I wanted to use some of those icons in a tiny shrine; it just seemed appropriate. And just to be clear...I really do study religious imagery...I've traveled quite a bit and I almost always make time to visit a church, cathedral, masque or temple. I've been in cathedrals in Germany, France, Belgium, Mexico, Canada, the UK and in almost every state...and when I traveled Asia, I would often visit temples and monasteries.  There is something beautiful, mysterious and "other worldly" inside the walls of a church or temple.  It's where we, as a civilization go to commune with the maker, and with ourselves, and I feel there's something incredibly powerful in the energy around places of worship.  

Ken Oliver Mixed Media Classes

So, I set out on my quest to create a tiny shrine...and I worked with tools and materials I know best, found objects and paper crafting tools.  


I cut a sheet of copper using a Spellbinders Arched window die, yes you can cut metals with some paper crafting tools.  


I used a Spellbinders M-Bossabilities Folder to emboss the copper.  This blog is less about being a step by step tutorial that will show you how to create this exact project, but more about using techniques, tools, and materials you may already own to create something completely new and different.  


I sanded and finished the embossed copper shape with a patina solution, then sanded again to reveal the detail of the embossed metal. I bent the bottom of the window back to create a stand. 

Spellbinders Media Mixage Bezel

Then created a shield bezel from Spellbinders Media Mixage line, but turned it upside down, as I noticed the shape of the shield echoed the shape of the arched window.  Inside the bezel, I used a Celtic Crucifix, a Sacred Heart of Jesus pin, palm fronds and scrapbook paper...it's all sealed under ICE Resin.  

Ken Oliver Mixed Media Classes

I affixed the cured bezel to the embossed metal stand with E6000.  Then I completed my tiny shrine with antique skeleton keys, also affixed with E6000.  The bottoms of the keys actually serve as tiny feet for the shrine.  To really make this tiny shrine glow, I buffed it with natural bee's wax until it was shiny.  

Altered Art ICE Resin Susan Lenart Kazmer

I love how the imagery and icons of this piece all work together, the shape of the Celtic knots on the cross are echoed in the embossed copper.  The shape of the keys is also repeated in the embossed metal.  The shape of the bezel is repeated in the arched shape of the embossed copper.  And, I love how the cross, the pin and the palm fronds are all preserved together in a tiny shrine.  The symbolic imagery conveys a story of faith and devotion and they're quite beautiful together, and hopefully I've captured that story in a way that is relevant and respectful. 

Thank you for letting me share this tiny shrine with you today...I really enjoyed the creative journey I went on as I was creating it and hope that you'll be inspired to create a tiny shrine too.

Ken