HomeAbout MeProduct VideosProductsWholesale Inquiries

Wednesday, February 27, 2013

A Cool Storage Idea to Keep your Creative Space Inspiring

Hey friends, recently I've been on a little bit of a mission...I realized that I needed to redesign my studio space, to make it more inspiring. It occurred to me that for the past few years, I'd relied on pieces from Ikea to house my supplies and tools and while those pieces are great, I wanted something that had a little more character, some pieces that really inspire me when I'm working.  I have loved primitive pieces all my life and so as I have started on my studio makeover project, I've naturally been drawn to pieces that have bare wood, crackled surfaces, metals and pieces that feel like they have the "patina" of age and use around them. I needed a space that let me work in a more "artful" way.   


While I was out over the weekend, I stumbled upon an antique, wooden cash register drawer at Rust and Roses in Phoenix that will help me keep lots of found objects and trinkets right at my finger tips and ready to use anytime I need them. 


I won't kid you, I am not the most organized person in the world. And when I looked at how I was keeping some of my supplies, in the blue little storage bit below, I was really a bit uninspired.  And it gets really easy for me to "junk up" little bins like this because I have a habit of "stashing" stuff just to get it out of the way.  


I realized that if I used something to organize my supplies that looked cool and had lots of separate little bins, that I'd probably be able to keep things more organized, because I like the way it looks and feels, and those pieces would always be right at my finger tips, ready anytime I need them.  And since this piece is an antique cash register til, I just love the way it feels to my hands...it's bare wood, a nice texture, and has some metal pieces and fittings which also give it come cool vintage character.  


There are enough little bins that I can organize buttons, trinkets and findings, I reserved on bin for antique silk sari ribbon from Nepal, and since I've always traveled a lot of have coins and money from all over the world...I love the idea of using these coins in my work...and they make sense, or belong, in a cash register.  


I have enough room to keep some interesting vintage photos right at hand...I even stashed some ephemera papers that I'd coated with ICE Resin...now they are ready anytime I need them and I won't have to shuffle through the little blue bins anymore.   


Really, I just love how this feels...I love the tactile experience I get when I reach for something in one of the little bins...it feels organic, natural, and inspiring to reach for a charm or object when it's stored in an artful, inspiring way.  I also feel really inspired by the creative energy that this piece imbues into my space...it's beautiful and useful.  


Thank you for stopping by today to let me share a couple quick ideas on how I've decided to create a more inspired creative space.  Your studio area can be both beautiful and utilitarian...and I feel like I am well on my way to living a more artful life when I surround myself with objects that inspire me...I also hope that you'll be inspired to find new ways to let yourself live an artful life...if you have any ideas you'd like to share...I am always open to new ideas...

Ken

Sunday, February 24, 2013

Card Classes with Spellbinders Labels Twenty Eight

Hey friends, I've got a few minutes here and wanted to show you a couple quick cards I'll be teaching this week at For Keeps Sake Retreat in St. Louis MO.  I'll get to teach card making with some of my favorite Spellbinders die templates during the retreat and I am really excited.  

The retreat is sold out, but I'll also be teaching a Spellbinders Media Mixage class at their shop during the retreat, if you are in the St. Louis area and would like to attend the Media Mixage workshop, contact the store directly (314-487-8131) to sign up. There are only a couple seats left.  

These cards I'm teaching at the retreat are so elegant and so easy to make.  It's only about 3-4 steps...and when you complete your card, your friends will rave about what you've created. Spellbinders takes all the guess work out of layering and creating beautiful cards.  


You'll only need a couple sheets of paper, I used white card stock and a couple sheets of the newest release from Graphic 45's French Country Collection

You can create the base of this card with Spellbinders 5x7 Matting Basics A S6-0001. It's one of the latest releases and is perfect for creating 5x7 cards.  I like bigger cards...you can use this die set for the card base and layering.   


Create the next layer with another new release, Spellbinders 5x7 Enchanted Labels Twenty Eight.  When you cut and emboss this die it's so elegant.  If you haven't got this one yet, put it on your wish list...once you get it, you will be in love!  It's going to be one of those classic dies that you will use over and over...

Then, complete your top layers with a one of Spellbinders classic die sets Spellbinders Labels Twenty Eight S5-127. This die set is a classic, when you cut and layer multiple pieces of this die you can create stunning cards and journal tags. 


I like to use Labels Twenty Eight either portrait or landscape...either way it's beautiful. In fact, any of the 3 dies in these cards can be used horizontally or vertically...beautiful either way.  It's part of the versatility and value Spellbinders puts in everything they make.   

To embellish the cards, stamp a sentiment, add a bow and a button, or any other embellishment you'd like to add and it's done...it's that simple!

Here are a few pics to show works in progress...to be honest, I've been on a card making binge lately with Enchanted Labels Twenty Eight...so I just cut lots of pieces of different paper, then layer them together to see what works best for me.  When you approach your art kind of intuitively like that, you can create some amazing and surprising combinations!  Again Spellbinders takes all the guess work out of it, and let's your creativity shine!


You will love how easy it is to create beautiful cards using these 3 die templates...I am off for now, I need to get my class supplies together and get all my charms and trinkets organized for a road trip! 


I am glad you stopped by today...thank you and I hope that you'll be inspired to create something beautiful! 

Ken

Tuesday, February 19, 2013

Creating Beautiful Bezels with Spellbinders Media Mixage

Hey everybody, I am blogging from the U.K. this week.  I am little excited to be attending the NEC Stitches Trade Show in Birmingham.  While at the show, I'm teaching techniques using Spellbinders newest line, Media Mixage.  

Ice Resin


I love working with Media Mixage. It's a very versatile line of items that are especially designed for mixed media use. Spellbinders, Stacey Caron,teamed up with internationally known designer Susan Lenart Kasmer to develop a very cool line that includes bezels, and dies to match, blanks, with dies to match, texturing plates, emphemera papers, foils, even metal sheets.  And we've introduced a hip little machine called the Artisan X-Plorer.  The Artisan X-Plorer is a high pressure roller press that die cuts, texturizes metal and even presses. So, it's fun stuff to use, and I love that I've gotten try it out and work with it long before it hit the market. Our world launch has been a whirlwind...first at the Craft Association Show in Anaheim, than at Creative World in Frankfurt Germany, and now at the NEC Stitches trad show in Birmingham England.  And, I gotta tell you...folks are loving it!  

We've been teaching bezel techniques at the show.  This is a set of 3 bezels that is so fun and so easy to make because Spellbinders has taken all the guess work out of creating the elements you use to inside the bezel.  Along with the bezels designed by Susan Lenart Kazmer, Spellbinders created dies to match each of the bezel shapes.  

The die cuts our ephemera papers, that fit perfectly into the bezels.


SLK ICE Resin


Then it's as easy as selecting some finding and pieces to include inside your bezel.  I picked from a big lot of antique watch parts I'd bought in Germany.


Antique Watch Parts


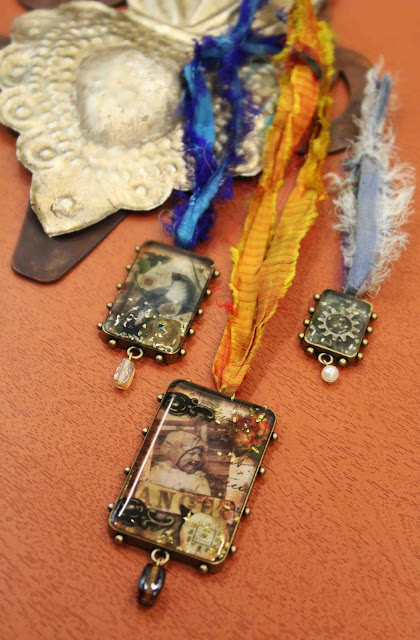
Next collect all the pieces and other elements you'd like to include in your bezel.  I added rhinestone chain, gems, a flower, some jewelry  findings, antique glass glitter, and a vintage family photo. 


Susan Lenart Kazmer ICE Resin


Create mini collages inside each bezel.  I glued the pieces down inside the bezel using 3-N-1 Adhesive, then after the collages were dry, filled them with ICE Resin by SLK.  


Spelbinders

I used some of the most fabulous antique glass glitter in these bezels...it's sterling silver and very reflective. You can actually "float" glitter on top of the resin. 

Spellbinders Vintage Melrose

And really, the next step is very easy...just wait....the resin takes about 6-8 hours to cure.  If you're impatient like me, it seems an eternity.  

Media Mixage Bezels

Once the resin is cured, your mini collages are encapsulated in a crystal clear glass like bezel and they're so beautiful. 


To finish them off, add a bead to the jump ring on the bottom and some ribbon or chain to the jump ring on the top.  I used antique silk sari ribbon from Nepal.  The wonderful thing about Media Mixage is that you can use just about anything you want to create these bezels...you can personalize in so many ways. And the bezels are great for all kinds of projects. 
A tiny bezel added to the front of an handmade card becomes an instant keepsake.  You can fill them with family photos, a button, an a scrap of fabric to create beautiful embellishments for scrapbook layouts.  The possibilities with Media Mixage are endless...the new product line really lets you Explore Beyond the boundaries of your normal crafting world and I know you are going to love it. 

Teaching at Stitches in Birmingham has been really fun this week...getting to show crafters new ways they can create is really rewarding...when you see the light bulb, that "flash" of idea light up in their heads...it's magical!  Even the President of The Craft and Hobby Association loves to create with Spellbinders Media Mixage. Andrej Suskavcevic stopped by for some one on one instruction for creating bezels and working with ICE Resin.  

Spellbinders

It's been a real joy this week in the U.K. getting to work with, and teach so many creative folks about using Media Mixage.  It's really so fulfilling to see the creative process inside each person come alive when they realize the beautiful little works of art they can create with the new Spellbinders product...it's like a spark ignites in their imaginations...you can really feel the creative energy when they get their hands on the new products....I love it!    


Media Mixage Bezels

Thank you for stopping by today...I hope you'll be inspired to create something beautiful today!

Cheerio!
Ken

October 1, 2014
Here's a little update to let you see what I've been up to with ICE Resin
Over the past couple years, I've been asked to teach ICE Resin workshops around the world...I absolutely love sharing the techniques with students...in fact, I am hosting an ICE Resin event on Friday October 24, 2014 in Newburgh Indiana...the event is called ICE at the Edge...it's going to be an awesome event...and I hope you can come.  Learn how you can enroll by clicking the link or the ICE at the Edge banner at the side of this page.   


Thursday, February 14, 2013

R&F Pigment Sticks at Creative World

Hey there, I am always on the look out for cool new art supplies.  I saw R&F Pigment Sticks at Creative World in Germany and I gotta get some of these bad boys.  Creative World in Germany was part of a bigger show called Paper World.  It's a great show for me, there's a very big emphasis on fine art supplies at the show.  I spotted something I'd never used before, R&F Pigment Sticks...and I fell in love. 


Basically, R&F Pigment Sticks are like oil painting in a stick.  The sticks are made of oil paint, and just enough wax to hold them together...so, it's like a BIG crayon that you paint with.  


You can use the sticks for lots of techiques...you can use them like crayons, you can use them with a knife for thick heavy applications, you can thin with linseed oil to make the pigment more like oil paints, you can even use a heat tool for blending.  Very cool stuff! 


Like painting with oils, you can build up heavy layers of pigment for very textured effects. And the drying time is a little less that with traditional oil paints.  And you can overlay layers of color for some cool effects.  


I can't wait to get my hands on a set of these...I see lots of applications for using pigment sticks in my projects...I love taking fine art supplies and applying them in new and different ways to craft projects.  

I love trying new things...

Thanks for stopping by today.  I hope you'll be inspired to try something new and different as you continue along in your artistic journey.

Ken