Hey there, I am glad you stopped by today, I have something very unique to share. I've been seeing so much amazing art lately and I've found myself drawn to tiny shrines. I love the way tiny shrines communicate something that is important to the one who makes it or the one owns it. And, for whatever reason, religious iconography is really fascinating and beautiful to me so I wanted to use some of those icons in a tiny shrine; it just seemed appropriate. And just to be clear...I really do study religious imagery...I've traveled quite a bit and I almost always make time to visit a church, cathedral, masque or temple. I've been in cathedrals in Germany, France, Belgium, Mexico, Canada, the UK and in almost every state...and when I traveled Asia, I would often visit temples and monasteries. There is something beautiful, mysterious and "other worldly" inside the walls of a church or temple. It's where we, as a civilization go to commune with the maker, and with ourselves, and I feel there's something incredibly powerful in the energy around places of worship.
So, I set out on my quest to create a tiny shrine...and I worked with tools and materials I know best, found objects and paper crafting tools.
I cut a sheet of copper using a Spellbinders Arched window die, yes you can cut metals with some paper crafting tools.
I used a Spellbinders M-Bossabilities Folder to emboss the copper. This blog is less about being a step by step tutorial that will show you how to create this exact project, but more about using techniques, tools, and materials you may already own to create something completely new and different.
I sanded and finished the embossed copper shape with a patina solution, then sanded again to reveal the detail of the embossed metal. I bent the bottom of the window back to create a stand.
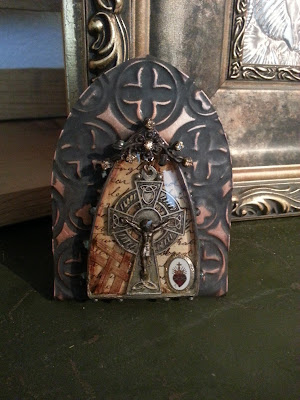
Then created a shield bezel from Spellbinders Media Mixage line, but turned it upside down, as I noticed the shape of the shield echoed the shape of the arched window. Inside the bezel, I used a Celtic Crucifix, a Sacred Heart of Jesus pin, palm fronds and scrapbook paper...it's all sealed under ICE Resin.
I affixed the cured bezel to the embossed metal stand with E6000. Then I completed my tiny shrine with antique skeleton keys, also affixed with E6000. The bottoms of the keys actually serve as tiny feet for the shrine. To really make this tiny shrine glow, I buffed it with natural bee's wax until it was shiny.
I love how the imagery and icons of this piece all work together, the shape of the Celtic knots on the cross are echoed in the embossed copper. The shape of the keys is also repeated in the embossed metal. The shape of the bezel is repeated in the arched shape of the embossed copper. And, I love how the cross, the pin and the palm fronds are all preserved together in a tiny shrine. The symbolic imagery conveys a story of faith and devotion and they're quite beautiful together, and hopefully I've captured that story in a way that is relevant and respectful.
Thank you for letting me share this tiny shrine with you today...I really enjoyed the creative journey I went on as I was creating it and hope that you'll be inspired to create a tiny shrine too.
Ken


